The Frankenpattern Shirtdress

9.29.2014

Oh hello, didn't see you there because I was getting all "Mommie Dearest" on Desmond. "No wire coat hangers IN THIS HOUSE!" These sort of things happen when you put on your spike heels and a giant rhinestone brooch. Fear my florals, folks.
If it had not been for the tsunami of germs this month, than I probably would have blogged about plans for the PR Frankenpattern contest. You know, before the project was actually done. Oh well, let's do a quick flashback to bring everyone up to speed. *Cue star wipe*

Picking a project for the Frankenpattern contest was a bit difficult. For one my brain went blank when it came to Frankenpatterning on a deadline.  The little gray cells went, "Pffft, we do what we want and right now that's marathoning two seasons of Mr. Selfridge. Suck it chump."  In addition the no drafting rule part of the contest kind of tied my hands. But, but, but, what if I need to tweak stuff?  I gots to tweak!!!  Between those two things I still didn't have a project sorted out by the time the contest started. Crap, better scour the internet for inspiration.

Burda came through for me with this plus sized dress pattern. Hey pretty lady.
Under different circumstances I would have bought the burda pattern and graded it down to fit me.  But who really want to do that, am I right? Of to the pattern stash I went to rifle around for something similar. What's this I see? McCall's 4769(OOP) and Bluegingerdoll Betsy have similar lines and all I'd have to do is join them at the waist. Perfect! Now you two jump in that shoe box and make me a franken baby.
Haa haaa, I wish that you could throw two patterns in a box and have them magically morph together. "Wonder twins powers activate - shape of a bitchen shirtdress!" Would really save on tape.
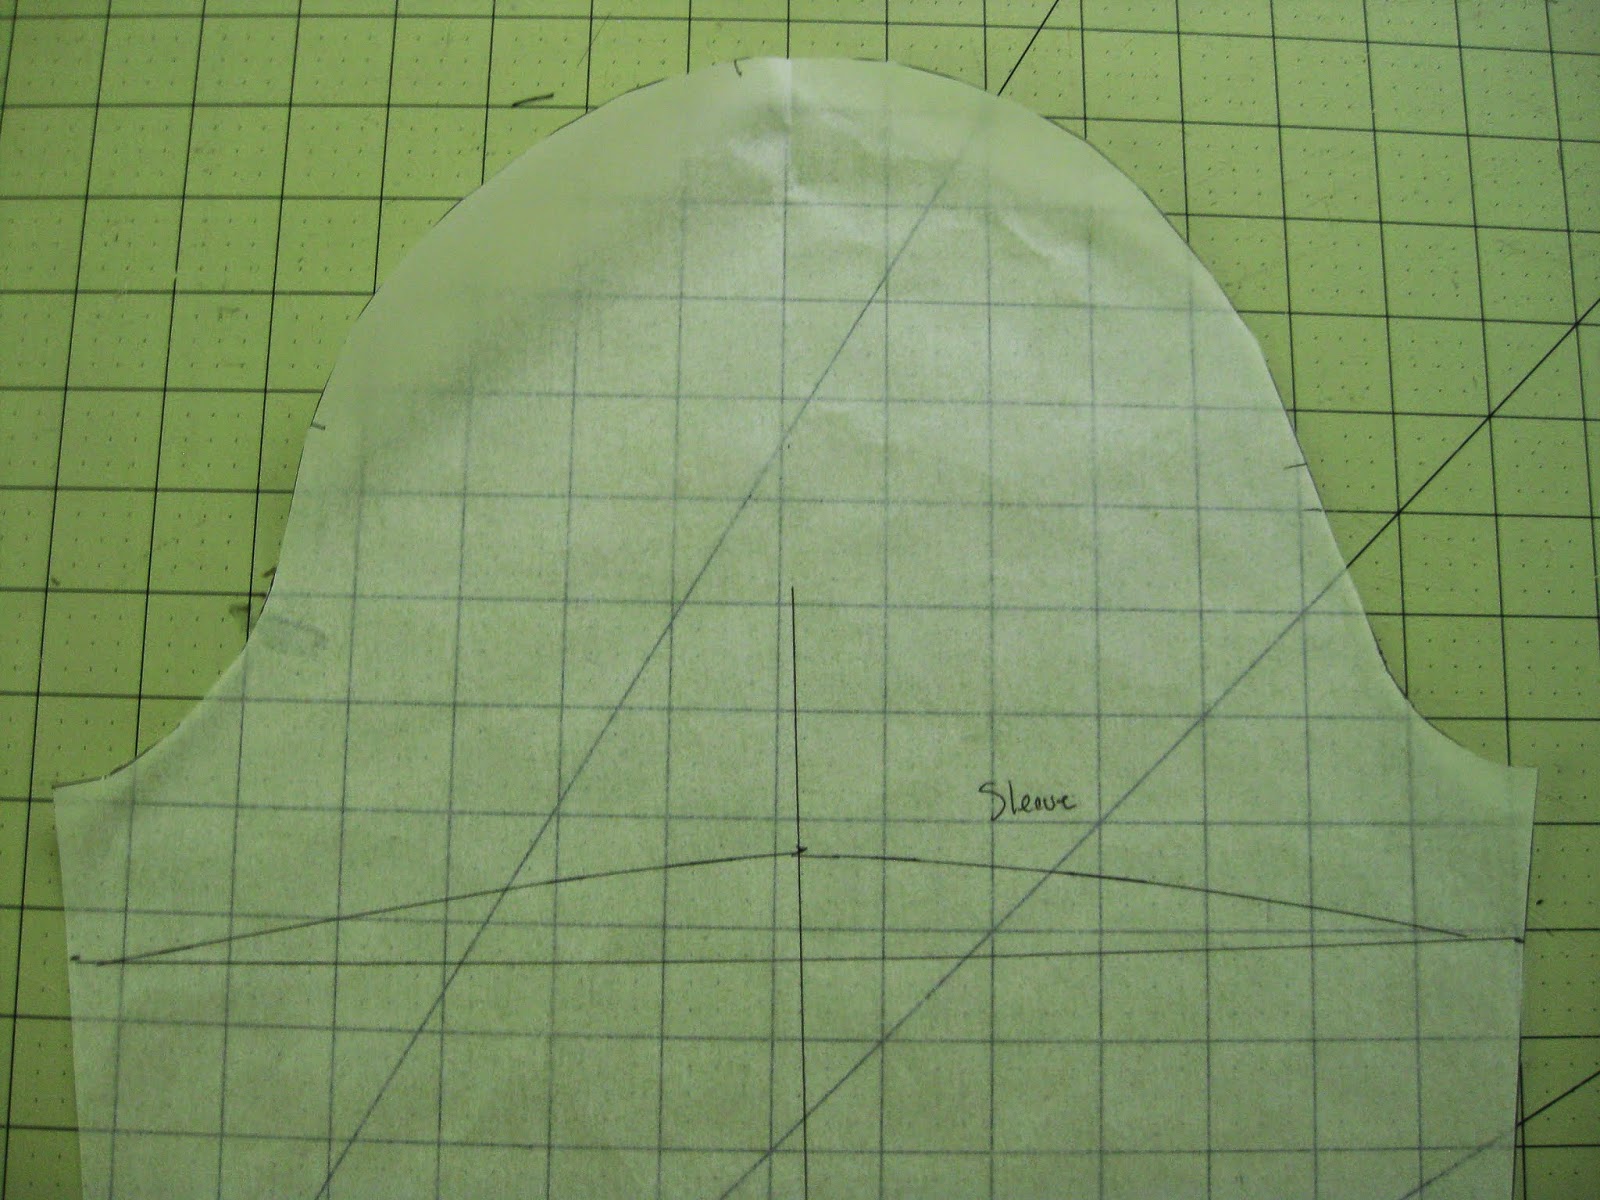
I used view E with the 3/4 length cuffed sleeves for the top half of the garment. Those of you with technical drawings in front of you might notice that I did make a pattern tweak. Scandalous! Yup, I removed the button band and extended the front edge of the bodice for the buttons. Figured contest mangers aren't eligible for prizes, so why not make the garment the way I wanted. Do as I say, not as I do. *wink, wink*
I've already make the View A of Betsy numerous times, so the plan was to fit the McCall's bodice to the skirt waistband. First step, grade down the bodice cause size 14 isn't in the larger size nest. Oops. Here I was all smug about not having to grade down a pattern. After that process was complete I added mostly standard fitting adjustments. Here's a list of all the things done to the pattern.
- Dropped the side seam dart 1" and shortened the waist dart by 1".
- 1/2" forward shoulder adjustment on the shoulder and the sleeve cap.
- Dropped the sleeve cap 1/2" and I also flattened the front of the sleeve a bit more. There seemed to be more ease in that location.
- Cut 5/8" of length off the collar. I may have made an grading error which caused the collar to be too long. Didn't feel like investigating it.
- Sway back adjustment of 1/4".
- Increased the back dart intake by 3/8".
- Extended the CF by 1 1/2" to replace the button band.
- Added a side seam zipper on the left side so the dress could be gotten on/off.
Increasing the size of the back darts made the back half of the blouse fit to the skirt. On the front I just overlapped the center fronts until the side seams matched up. The overlap ended up being 1" which was the perfect amount for the 5/8" buttons. It's nice when things work out when you're really just winging it.

The dress is made out of yet another stashed Ascher Studio print cotton. I stashed a lot last summer and it's a good thing to since no one seemed to stock new prints this year.  Come on Ascher Studio, I need more vintage feeling large scale flora prints. They complete me.  Anyway this cotton has zero stretch which does make getting the dress off and on "interesting." A little bit of shimming is involved, but I did leave myself enough ease so that no seams are in danger. Aside from that, I think this fabric complements the design perfectly.

Overall I'm pretty pleased with this mash up, but there are two things I would change. Number one, the bust area and back seem a little blousey.
It's not horrible and one doesn't want to remove so much ease that their woven garment becomes uncomfortable. Still it seems a touch bigger than my usual fit.

Number 2, forgot to move the waist/back darts a bit so that they matched up with one of the Betsy darts. Guess my quality assurance Frog was asleep on the job about that one. *cough, passing the buck, cough*
So there you go, another frankpattern creation released into the wild. I'm available to berate children/coworkers/significant others in my floral power shirtdress. Just call and make an appointment with Froggie. I promise to show up looking stern and commanding and not like this.

Wardrobe Holes

9.21.2014

I've spent most of the last week in bed thanks to the latest round of "school germs" that Desmond has so kindly shared with me. They say that sharing is caring, but the line really should have been drawn before getting to germs. It would also be helpful if my toddler would stop trying to stuff his fingers in my mouth. Love you kid but your obsession with my lipstick needs to stop.

So anyway, forced bed rest is bad for sewing/blogging/housecleaning, but it is good for planning, knitting, and watching Timothy Olypant be menacingly charming in a cowboy hat. Honestly guys, why didn't you tell me about "Justified"?   Olypant in cowboy hat, Marshalling shit up! Pretty much the perfect show for a girl that was raised on Westerns and cop movies.
While the sewing part of the Fall Essentials plan has gone to shit, Timothy/Rayland and I have been making pretty good progress on the Chickadee sweater.  Thank the lord for that or I'd be ripping my hair out right now thinking about how I'm going to be ice cold in a few weeks. Chickadee is a top down sweater and I'm just to the point of starting the waist decreases. That's probably not 50% of the sweater done, but it has to be close to it.
On the planning front I've been mentally adding things to the Fall Essentials list as I find myself reaching for clothing that doesn't exist. Damn, why aren't my sewing elves anticipating my every need? So far these items must to find their way into my closet....

1. Some sort of snow leopard top - All my snow leopard fabric has been used up. How did this HAPPEN!? Please don't revoke my animal print card.

2. Cobalt skirt and/or pants - DSW told me to do it.
3. Magenta or purple skirt and top - The stash does have magenta jersey so my 20th or so Nettie is an option. Still I'd like a purple skirt because fabric purchases are fun and I already own two pairs of purple shoes.

4. Anything hot pink - My pink and black Luxulite set needs some love.
5. A black and white striped raglan top - Keep seeing people wearing these on instagram with brightly colored skirts. "I want to go there."

OK then, I'm sure adding a bunch more things to the sewing list is not going to stress me out in the least. Shhhh, shhh, shhh brain, turn on some more "Justified" and look at the cowboy hats. "You'll never leave Harlan alive, baby."

New Bluegingerdoll Pattern - The Odette Dress

9.12.2014

Oh my it's been a busy week around these parts, everything happened at once! Sorry about clogging your blog readers, but I have one more thing to share with you. Something I've been sitting on for awhile and has been staring at me from the corner of the sewing room. That's right secret sewing!  Abby, of Bluegingerdoll, is always hard at work making new patterns and I had a good time with this last one. So without further ado let me show you the Odette dress.
The Odette dress comes with a contrast bodice inset feature, waistband and 6 panel gored skirt.  The contrast panel is "buttoned in" right along the neckline split. This gives you the option of making several insets with different buttons to change up the look. (Confession - I made up more than one because I couldn't decide if yellow or black buttons looked better.)
This pattern also has several sleeve options, sleeveless, cap sleeve, and 3/4" with cuff.  I've close the cap sleeve on my version. Like all Bluegingerdoll patterns the bodice is fully lined for a clean finish on the inside.
For this sample I pulled out some stash cotton originally purchased from Emmaonesock.com. It's from Ascher Studio, a favorite fabric designer of mine, but is a little heavier weight then the other Ascher cottons in the stash.  I figured that the Odette pattern would work well with this fabric. The thicker weight would help make the cut out neckline stand up crispy and also look good in the gored skirt.  My fabric pairing instincts proved to be right and I'm really happy with the fabric/pattern pairing here.  Though I will confess that I could have done some work figuring out pattern placement.  The majority of the yellow flowers ended up on the back of the dress. Oops.
I really love the skirt on this dress. Gored skirts are such a nice way to get fullness at the hem while keeping the waist area nice and trim. Oh and I almost forgot to mention that it has inseam pockets. What's in your pockets, precious?  Why the other inset I forgot to take pictures of..... Blogger Fail.

Finally a quick list of my fitting details since they come in handy every now and again.
- I went one size up from the recommended size because I like more ease.
- I did all my standard fitting alterations to the bodice. Dropping side seam dart and waist dart point 1 ", forward shoulder adjustment 1/2", Upper back widened 1/2" and back waist dart intake increased. In this case the intake was increased to a total of 2.5".
- After all my standard adjustment the bodice was still a little roomy in the waist band area. I nipped out about 1/2" at each side seam for a total of 1" removed.  Adjusted the top of the skirt to match and then everything fit nicely.
To celebrate your purchase of Odette will be 10% until 9/14/2014 when using the code Odette2014 at the checkout. So head over to the Bluegingerdoll store if you're in the mood from some pattern therapy.  I love the smell of new patterns in the morning.

It's a Celebration of Sewing

9.11.2014

September's not just about school supplies, and planning for Fall.  It's almost National Sewing Month!
To celebrate Maris, of Sew Maris fame, is doing a series of guest posts on the topic, "Why I love to sew." Guess who volunteered to write one? That's right Froggie.....er I mean me.  So if you enjoy my irreverent look at the world of sewing, then pop on over to Sew Maris and take a look.  After you're done proudly wear out your me-mades and see who you can convert with your sewing stories.  Come to the sewing side, we have silk and chocolate.  Hopefully not mixed together.

1940's Dress Part Three - Sleeve Changes

9.11.2014

Almost there 1940's dress hackers. You've created/modified some insets, converted your bodice to a wrap and added some shoulder tucks. Today we'll cover the final steps to modify the sleeve. First up, shortening the sleeve to a cap. Then the final touch of adding ease to the sleeve so that it can be gathered up into a pretty poof. To do these steps you'll need the following pattern piece:

*Sleeve

Shortening the Sleeve
How to covert 3/4" into a cap.
1. Take a traced copy of the sleeve and measure 1" down from the top edge of the side seam. Repeat on the other side.

2. Using the new marks square a line across the sleeve.

3. Find the center of this newly drawn line and mark. From the mark draw a vertical line through the sleeve cap. Mark 1" up on the vertical line. Note: The measurement of an 1" here is arbitrary. If you like the sleeve to be smaller you can increase this measurement and continue with the same steps.

4. Use a french curve to redraw the hemline of the sleeve. Cut off the excess length.

5. Now we will reduce the sleeve cap height.  Using the same sleeve center line measure an 1" down.

6. Redraw the sleeve cap curve with a french curve.

7. Redraw any notches if needed and then cut off the excess.  This change will make the sleeve sit out farther from the dress which will complement the gathers we are about to add.

"Puffing"/Adding ease to the sleeve
We are going to slash and spread again to created gathers.
1. Evenly space about 3 marks across one half the cap of the sleeve.  I used the measurement of 1.25" to space my marks.  If you want less ease added to the sleeve then make fewer marks. More ease then add more marks.

2. Repeat step one on the other side of the sleeve cap.

3. Draw lines through the entire sleeve at each mark.

4. Cut each line from the sleeve cap almost all the way through. Leave a "hinge" at the cuff edge.  You can see I did not cut the center line. You can chose to cut this to add additional ease or leave it uncut. When you are done cutting then fan out the cut areas a bit.

5. Place a large piece of paper behind the sleeve.  Tape down the center and then spread each cut area .5" wide. Tape down at this measurement.

6. With a french curve go redraw the sleeve cap to a smoother curve.

7. Cut out the adjusted sleeve and you are finally done all the 1940's dress modifications. Hooray!
When sewing the sleeve, take the sleeve cap gathers and cluster them around the shoulder seam area. The rest of the sleeve should be set in smoothly.  To finish the sleeve hem edge use Gertie's tutorial on using piping as a facing. You can use store bought piping or use some self fabric to make your own.

OK folks, that was an intense 3 day course and I hope you found it informative.  If you have any questions or need clarification feel free to comment/contact me.  I will do my best to answer between surfing the internet for T-strap shoes. ;)

1940's Dress Part Two - Upper Bodice Changes

9.10.2014

Hello again intrepid pattern hackers! Hopefully you've gotten your insets all worked out, or at least gave the directions a once over.  In part two we'll be covering the two design changes made to the upper bodice. First we will convert the bodice to a faux wrap style. Secondly a cluster of tuck darts will be added to the shoulder.  To complete these steps you will need the following pattern pieces:

* Upper Bust Panel
* Neck Facing
* Center Back
* Side Back

Converting Bodice to a Faux wrap
Time to change the CF seam into a wrap.
1. Trace the bust panel pattern piece and cut around the pattern leaving some extra paper on the CF side.

2. Lay your ruler on the lower edge of the neckline curve.  Extend that line out.

3. Remember how we cut off the point of the waist inset in the previous post? Now we have to add that bodice length back in.  On my inset I cut off 1" so that will be the amount I add to the bottom of the bust panel.

4. Measure down from the original CF line the amount you need to add. In my case 1". Make that placement.

5. Use a hip curve or a regular ruler to redraw the bottom edge of the pattern.

6. Next we are going to fill in the neckline a bit so there is enough room on the shoulder for all the tucks. Increase the front edge by tracing a parallel line 5/8" away. After that is finished cut out the bust panel pattern.

7. Before you forget, grab the center back piece and fill in the neckline 5/8" there too.

8. Now we will fix the facing to match the bodice changes. Place the facing on top of the bodice, notches matching. Trace the lower part of the facing along the new bodice lines. Remove the facing for now.

9. Draw in the shoulder seam allowance on both the front and back pieces. You might also want to pin together the center and side back. Line the shoulders up on the seam lines like you were going to sew them.

10. Place the facing back on the patterns, lining the facing up with the neckline notch. Slowly pivot the facing around the neckline curve so that it lines up with the back neck.  Reduce the length of the facing here and reposition the double notches so that they match.

11. The facing modifications are complete and the pattern piece can be cut out.

Adding Shoulder Tucks
We'll be doing some slashing to the pattern to make shoulder tucks.
1. If you haven't done so already, draw in the seam allowance on the shoulder of the bust panel.

2. From the shoulder edge, measure 1.5" and mark.

3. Make three more marks .5" away from each other.

4. Place the clear ruler on one of the marks, perpendicular to the shoulder seam line. Draw a line all the way through the pattern.  Repeat the process until you have 4 lines drawn through the pattern.

5. Cut each line from the shoulder almost all the way through to the bust seam.

6. Place a large piece of paper behind the bust panel. Spread the cut areas open until they are an 1" away from each other. Then tape down the pattern all along the cut edges.

7. Draw in lines 1" from the seam allowance down each cut area. When you make the dress you will sew the tuck down to that mark. Also draw in an arrow pointing towards the neckline so you remember which was to fold the pleat.

8. Trim off any extra paper attached to the pattern and the finished piece should look something like this.

Shewwwww, after all that hacking I think we need to call it a day. I'm sure your pointer finger is tired of scrolling. In our last hacking season, part three, I will show you all the sleeve changes needed to finish up your dress.  Till then happy hacking!
Proudly designed by Mlekoshi pixel perfect web designs