In which I make a dress that is not "me"

7.31.2014

I love blogging about sewing plans, but have to admit that my follow through on those plans is pretty poor. "Let's see, I have a nice sewing list here and.....Ooo look something new and shiny!!!" Yup, that's the way it usually goes.  However it seemed to be in bad form to ignore the plans for my own sew-a-long. Cowboy up already Heather and knock off that modcloth dress! OK fine, but it's going to take forever and I'm going to be slightly miffed at the end of it.
Soooo yeah, this dress.....I have a lot of mixed feelings about it.  They say the road to hell is paved with good intentions and I think sewing is sometimes like that.  Except its the yellow brick road of franken pattern options. "Circle skirts, and piping and buttons, Oh My!"
I'm 100% sure that some of you are scratching your heads and thinking, "What the hell is wrong with this dress? Heather you are cray, cray." Super cray cray I know, because on the hanger this dress looks cute to me too. The color, the little white details and the skirt, all of it is a win. Sitting here now I can picture several people rocking this dress, but I don't really like it on me. It's a little "too cute."
It took the Pinup girl website to make me realize what I should have done. Gored skirt and ruched detail at the bust. Argh so close! Personal style can be a tricky beast some times. Especially when you think you like what you don't actually like.  What is up with that brain?
While I went a little too far out of my personal style zone, this dress might be your cup of tea. Here are all the deets if you'd like to make one of your own.

Bodice - Cambie hacked into a princess line bodice. See below for the tutorial on how to do that. My bodice is fully lined with some Siri lining.
Skirt - Full Skirt option from Butterick 6019.  It's pretty much a standard half circle skirt so you could also draft your own. I had to take just a hair (1/4") off the side seams of the skirt to get it to fit to the bodice. Butterick 6019 does not come with pockets, but it was easy to insert some standard pocket bags into the side seams. I borrowed the pockets from Simplicty 2444 to do this.
Store bought piping was added to the neckline and the waist seam.  I bought a piping foot for this project and  found it resulted in superior results.  I couldn't get close enough to the piping with my regular zipper foot and the piping seam was showing on the outside of the garment. Attached piping foot and the problem was immediately solved.
To wrap this up let me show you how to convert the Cambie bodice into princess seams. This is very basic pattern drafting stuff, so I apologize if it seems like a no brainer.  I wondered a bit if this technique was worth a tutorial at all. In the end I decided yes because a sweet heart princess line bodice is the perfect starting point for so many other hacks.  For instance this tiki number, or this polka dot modcloth design. Eh see, good stuff. So let's get to it....

Tutorial - Changing darts to princess line seams on the Cambie Bodice
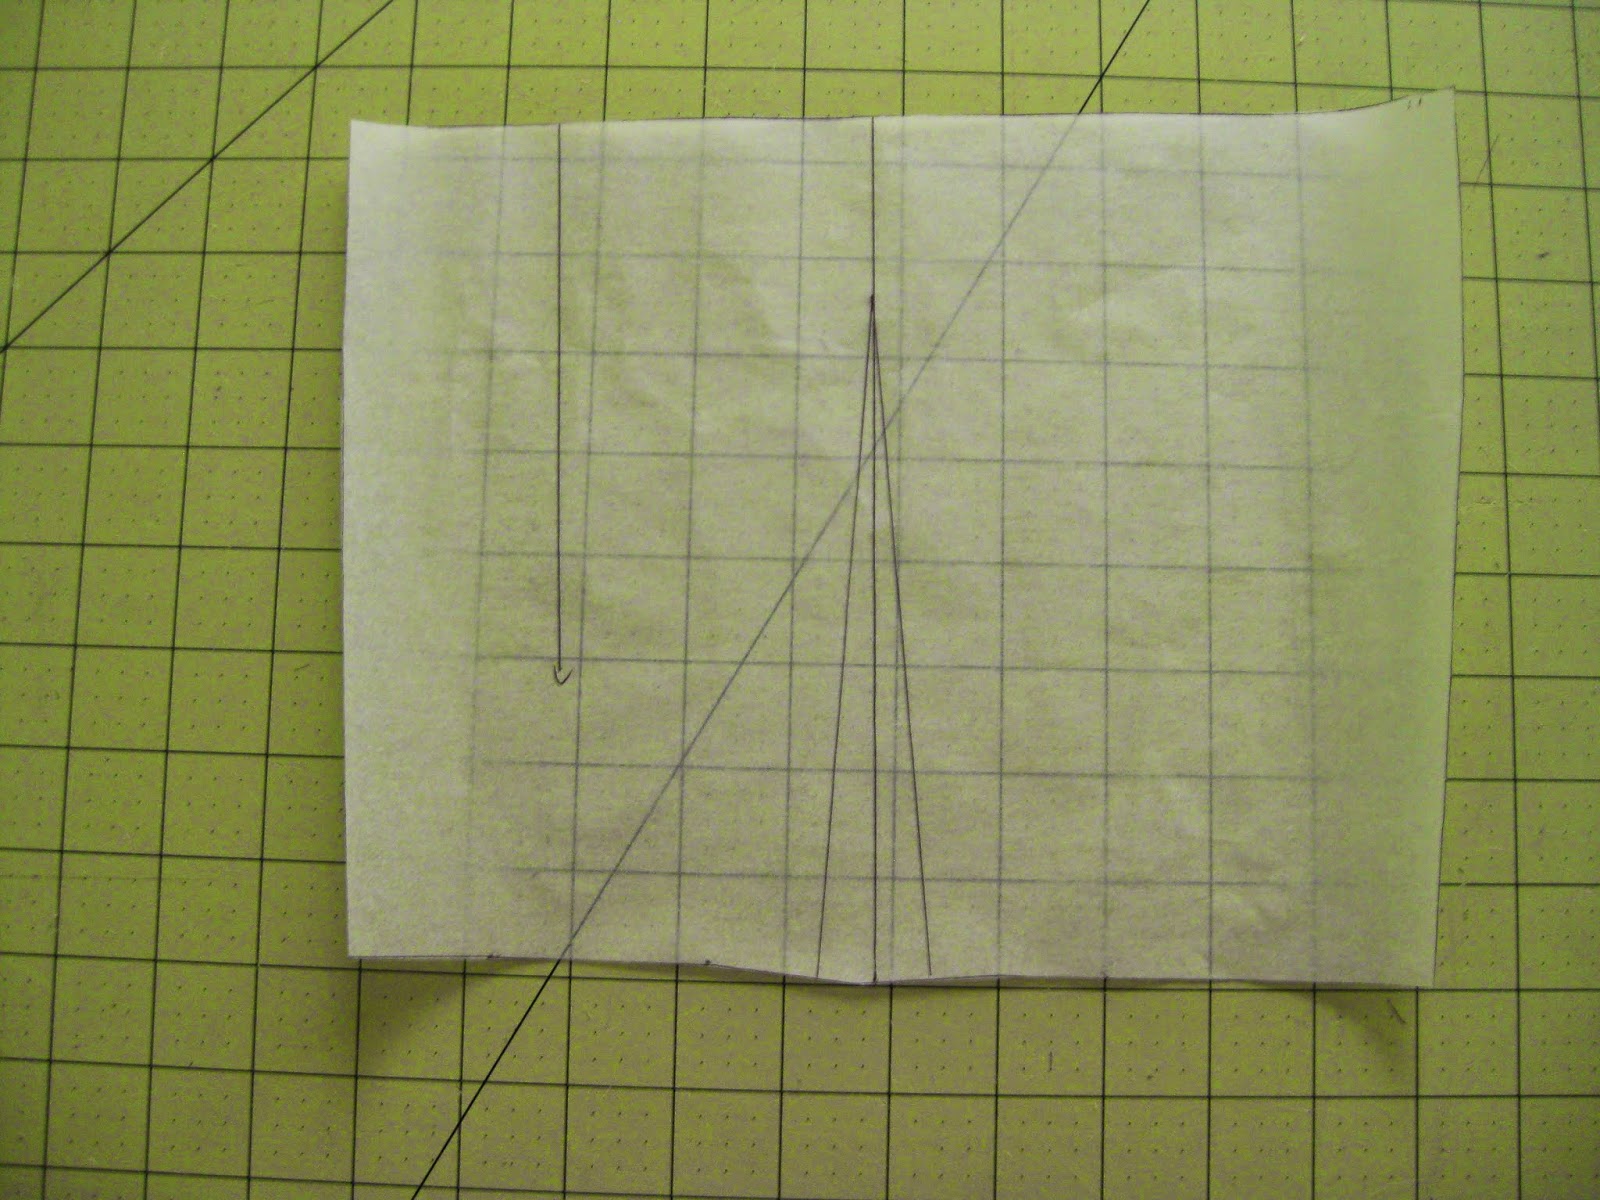
1. Starting with the front bodice, find the center of the dart intake and mark.


2. Draw a line from that mark, through the dart point and up to the neckline of the bodice.

3. At this point you might want to tweak the sweet heart seam line to a slightly rounder shape since a seam line will be going through it.

4. Once any neckline changes are complete, cut the pattern apart along one dart leg, then along the newly drawn line.

5. Next cut off the rest of the dart intake.

6. Go in and smooth out the "points" left by the top of the dart. You want the new seam line to be nice and smooth.


7. Time to convert the darts on the back, but first we need to cut down the pattern piece.  Using the top of the side seam as a guide, square a line across the back.

8. Cut the back pattern along this line and discard the top half.

9. Now we'll do the same steps on the back that we did on the front.  First mark the middle of the dart intake.

10. Draw a line through the intake mark, dart point and up to the top of the pattern piece.

11. Cut the pattern apart along one dart leg, then along the newly drawn line.

12. Next cut off the rest of the dart intake.

13. Smooth off any points left by the tops of the darts. On the back this might not be noticeable because the dart is a smaller size.

14. Now that the shaping of the seam lines is complete, you need to go back and add seam allowance to the new seam lines. Once SA is added the bodice is ready to sew.


*Bonus step - You can put any kind of strap on the bodice, but if you like mine the dimensions are 5" x 15.5".

Extra bonus step - Put on dress. Parade around local public areas and have the local residents come out of their houses to stare at you.  Don't mind me, just being awkward. Carry on with your lawn mowing sir.

Nora - Beta version revamped

7.28.2014

Thanks for all the feedback about blogging repeats everyone.  The consensus seems to be that it's fine in moderation and if the patterns are made up in different colors/fabrics. That's good because today's post also is a bit of a repeat. Just kind of repeat I'm more comfortable blogging about.

Remember the pattern mash up of Nettie and Flora, or the Nora as I liked to call it?  Well today I'm showing you slightly tweaked version of that pattern love child.  It's my Nora muslin revamped.
Most of you probably know that I'm a serial musliner.  It's my way of working out not only fit problems, but any dumb brain farts that might happen when I'm sewing a garment for the first time.  And let me admit that I still make A Lot of dumb mistakes when sewing. Enough that it's a tad embarrasing. Therefore it's no surprise that I whipped up a muslin of the Nora idea before cutting into the precious tree knit.  The knit muslin stores are a bit low at the moment, so I used the left over chuck of green polyester jersey from last summer's favorite dress.
The muslin Nora was close to being perfect but for a few things.  First the neckline was too low and secondly using a facing to finish the neck and armhole didn't work well. The only reason I'd put in a facing in the first place was that there wasn't enough fabric to cut a full self lining.  But whatever, it's just a muslin right? I threw the muslin in the corner and went off and made the "real" tree print version.

If I'd used some crappy knit that probably would have been the end of it.   Instead I keep starting at that pile of green knit thinking, "It's almost wearable and there are decently sized fabric scraps to work with. Why not use those problem solving brain cells?"
First bit of business was to rip out that crappy facing. Next I shortened the shoulder straps by about 1/2" to counter act some stretching and take care of part of the low neckline problem.  To further fix the depth of the necking I decided not to reinvent the wheel and used the Nettie neckband. Due to the width of my fabric scraps the neckband had to be made out of two pieces, but who's checking for extra seams at the shoulder anyway.  Now the dress wasn't too low cut, hooray! Why not continue with the theme and finish with some bands at the sleeves?
Yeah, I did put bands on the sleeves and it looked horrible! The proportions of the shoulder area were wrong for a banded sleeveless finish.  Hmmm, cut into the bodice blindly or put on some sleeves that would probably work? Sleeves it is then.  Due to my fabric scrap constraints the shortest sleeves in the pattern stash were chosen, the shortened skater sleeve used in this dress.

When I tried on this dress to check the sleeves it was instant love, just like the dress in this fabric last year. Oh my lord, the fabric is magical! Why hadn't I bought 10 yards of this fabric? What am I gonna do next year? Crap, need more magical fabric and or a time machine to buy more of this magical fabric.

For now I'm contenting myself with wearing this dress on a weekly basis. It goes with half of my Luxulite brooches and is comfy as all get out. Note to self, buy solid colored jerseys once in a while.  It's not a crime to have a layering base some times. Don't you agree Desmond.....Desmond?  (He just runs off to play with worms.)
P.S. I took these photos right off the "main drag" of my local town center. It was the first time that I had a lot of foot traffic and consequentially gawkers around while taking blog photos. So if I look kind of stiff or weird in these photos that's why. 

Second verse, same as the first

7.24.2014

Don't mind me, just lurking in an alley in the exact same outfit I blogged about in June. Different fabrics, different colors, and print usage reversed....but nothing new or ground breaking.
Generally I don't blog repeats much.  Both because the drive to try out new patterns is strong and because the things I remake are usually simple basics. Wouldn't want anyone's head to rage explode over having to read yet another blog post about a new Renfrew. (At this point Renfews just breed on their own like rabbits. There's some questionable fiber mixing happening.)
At the same time many of my favorite bloggers, Gillian and Roisin for example, often remake patterns and I enjoy seeing how they look sewn in different fabrics. So hopefully you'll indulge me in a little pattern rehashing today.  I picked a pretty alley to make it go down better. ;)

In recap I'm wearing the Nettie bodysuit and the bottom half of the Emery dress turned into a skirt.  This time Nettie is made up in a rayon knit, still in stock, from Emmaonesock.com. The fabric is described has having a dry hand, which I can say is completely accurate after fondling it in person. In the future I'd prefer to buy rayon knit with this sort of finish. The texture is very pleasing and it's more matte looking on the right side than standard rayon.  Mo matte, mo better. Is that what the kids say?  Probably not.
Just like my previous Emery skirt, this one is a rayon woven. I bought this last year from the now out of business Waechters. (It still hurts) It's hard to see in the pictures, but the color is not solid. If you're into knitting, it's similar to a semi-solid yarn.  The fabric looks like it was over dyed with a hue very close to the original, giving it small areas that are a slightly lighter or darker blue.
A big thank you to Twirl Designs for suggesting using spray starch on the rayon before cutting.  I found that it made my cutting and sewing process a lot less stressful. There was a slight bit of shifting in the fabric during cutting, but it was loads better than cutting starch free. After finishing the garment I washed and dried the skirt and my rayon returned to it's normal billowy self.  Made me momentary consider stock piling more rayon wovens....but stash busting. It's for the better anyway. Those pesky rayons are always making my stacks of cottons fall over out of the closet. Usually right when my husband is entering the room which makes him give me the side eye. Too much fabric? I haven't a clue what you're talking about. Just step over it and carry on with your day.

Annnnyway, it's great having some patterns that can be considered a "seasonal uniform." Items which coordinate and make me feel put together. Certainly helps on those days were I'm strapped for time or don't really know what to wear. However what's great for your closet isn't always what great to read about on a blog.  So what are your thoughts on repeats/blogging about them and so on?  OK in moderation, or horribly snooze inducing and when is the crazy frog going to show up again?  You know he's got talent.

Thank Heaven for Little Girls

7.22.2014

Thank heaven for little girls, cause little girls need fun dresses every birthday. Thank heaven for little girls, cause aunty's get to buy more yardage and yell hooray!

You've probably figured out from my little ditty that sewing toddler dresses is one of my favorite things. Every year I wait with baited breath and credit card in hand for my niece's birthday. If you're buying girlie, girlie knits for someone else it doesn't count as stash. Froggie told me so.  I hear some of you saying, "Pffftt that frog is the biggest enabler ever." Well I must defend Froggie's honor and say that he gave me the purchasing limit of fabric for one dress, the fairy print.  Then we tossed the stash and pulled out the owls knit and some beefy pink spandex for dress number two.  See, see, just a little bit naughty with the fabric purchases. Don't ask about our chocolate intake.

Both dresses are the Kitschy Coo kids skater dress with a few minor alterations.  Froggie and I though we should shake things up a bit since the little girl in question already has a few regular skaters.  We also had the extra creative challenge of discovering there wasn't quite enough of the owls knit for a 3/4 T skater after cutting out the skirt. Oops, we are usually much better at laying everything out before cutting.  Must have been too hopped up on chocolate.

For the fairies dress a Comino cap like seam was dropped into the bodice. One of us is obsessed with that pattern and the other said he'd been told little girls like princessy clothing.
For the owls version Froggie and I did another sort bodice piecing to get around our yardage snafu. We though a big "belt" like waistband would look similar to woven dresses with wide ribbons around the waist.
Our original plan was to do a Katie MD flutter sleeve, but thought the dress needed a banded sleeve to balance out the waistband.  Instead we slashed up the pattern, creating a puff sleeve.
After completing these two cute dresses Froggie took a nap.  Sewing excitement really wears him out.  I remained awake and put in a little more elbow grease taking pictures of how to make these design changes.  Must....infect....you....with...more.....hacking.

Sweet heart neckline version
1. On the front make a mark on the side seam 3/4" down from the armhole.

2. Place french curve on the pattern like so. The tail in should touch the side seam mark.

3. Trace the curve from the CF over towards the armhole, but stop before you get to the side seam.

4. Flip the french curve the other direction and complete the sweetheart seam line.

5. Cut the pattern in two pieces along the line.

6. Add seam allowance to each side of the newly drafted seam. (I put 1/4" SA on these pieces)

7. On the back draw a mark on the side seam 3/4" down from the armhole.

8. At that mark, draw a straight line perpendicular to the CB across the pattern.

9. Cut the back apart on that line and add seam allowance to both sides of the new seam.


Puff Sleeve Version
1. The "waistband" piecing is the same idea as the cormino cap seam above.  Measure 2 1/4" up from the bottom of the bodice. Draw the line following the curve of the bodice waist seam. Cut apart and add seam allowance.

2. Trace a copy of the short sleeve skater sleeve.

3. Mark 1" along either side of the sleeve head notch.

4. Draw vertical lines through the sleeve at the new marks and at the sleeve head notch.

5. From the sleeve head edge, cut the pattern along these lines but not all the way through.  Leave a small hinge at the cuff edge so that the sleeve can be fanned open.

6. Decide how much extra ease to add to the sleeve. I decided to add 3/4" to each slash line for a total of 2 1/4" extra ease.  Each slashed area was then taped open at 3/4".

7. Smooth out the new sleeve cap with a ruler and cut off all the overhanging paper.
Ta Da! You are now prepared with patterns for outfitting adorable bounty hunters. Watch out, she's packing suds! Don't encase me in a bubble. Noooo!

Proudly designed by Mlekoshi pixel perfect web designs